
Making some Noise - Teensy, TGA-Pro, and MIDI
Making Some Noise (and maybe even Music)!
In this blog post, I’ll share my experiences using the Teensy and TGA-Pro Guitar Audio Shield to process audio - both using an audio processing codec as well as MIDI. I’ve also included the Yamaha UX16 USB-to-MIDI controller to aid in patching my MIDI channels into the inputs of the Guitar Audio shield.
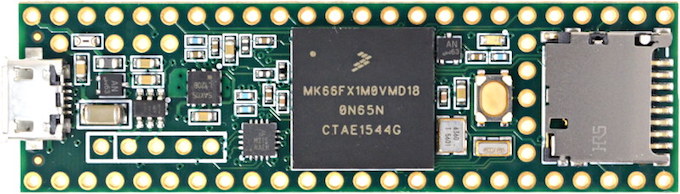
Teensy - Yet antother cheap USB uController board.
At the hear of this project is the Teensy 3.6 USB Microcontroller development board. This sub-$30 board is a feature-rich micro-controller using the Cortex M4, floating-point unit, digital and analog pins, and lots of communication protocols (USB, i2C, SPI, Serial, Ethernet). What makes this little USB-attached board so useful are the accompanying software elements:
- Teensyduino - An ardiuno-like IDE for the Teensy
- Extensive code libraries - An Awesome collection of libraries compatible with the Teensy. Additionally, many of the arduino libraries are compatible (or are easily modified) with the Teensy.
To get started, be sure to have the latest version of the arduino IDE installed, and then visit the Teensyduino install page to get setup for Teensyduino.
TGA-Pro Guitar Audio Shield
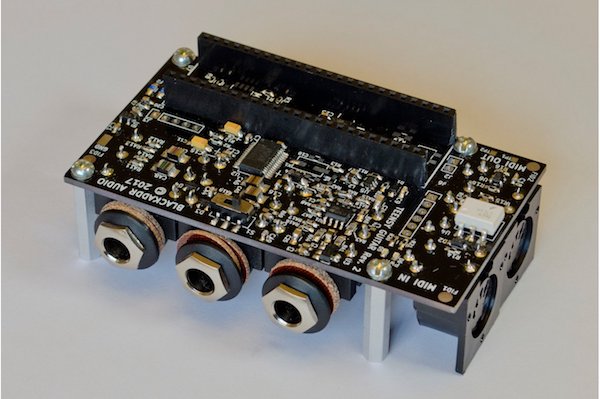
Now that you’re all set to rock and roll with your Teensy development, let’s add the TGA Pro Guitar Audio shield to the mix. This board allows us to mate our Teensy to the shield, access MIDI and codec audio units and process audio programmatically through the Teensy!
In addition to the board, the developer also offers a Teensy library just for the board, BAGuitar Library. Before installing the library, be sure to install the dependent Dma-Spi library.
Sanity Check: First things First.
Before moving forward, it’s a good idea to verify that your setup works, so I strongly suggest running the BAGuitar Try Me First sketch. This sketch verifies that the Teensy 3.6 has been installed properly in the TGA Pro socket and can be programmed. We also test the MIDI ports on the TGA Pro. For this test you’ll need a MIDI cable so we can loop the input to the output.
#include <Wire.h>
#include <Audio.h>
#include <MIDI.h>

MIDI_CREATE_DEFAULT_INSTANCE();
using namespace midi;

AudioInputI2S            i2sIn;
AudioOutputI2S           i2sOut;

// Audio connections, just connect the I2S input directly to the I2S output.
AudioConnection      patch0(i2sIn,0, i2sOut, 0);
AudioConnection      patch1(i2sIn,1, i2sOut, 1);

AudioControlWM8731      codecControl; // needed to enable the codec

unsigned long t=0;
const int usrLED = 16; // the location of the GTA Pro user LED (not the LED on the Teensy itself)
int usrLEDState = 0;

void setup() {

  // Configure the user LED pin as output
  pinMode(usrLED, OUTPUT);
  digitalWrite(usrLED, usrLEDState);

  // Enable the MIDI to listen on all channels
  MIDI.begin(MIDI_CHANNEL_OMNI);
  Serial.begin(57600); // Enable the serial monitor
  Wire.begin(); // Enable the I2C bus for controlling the codec
  delay(5);

  delay(100);
  codecControl.disable(); // Turn off the codec first (in case it was in an unknown state)
  delay(100);
  AudioMemory(24);

  Serial.println("Enabling codec...\n");
  codecControl.enable(); // Enable the codec
  delay(100);


}

void loop() {

  ///////////////////////////////////////////////////////////////////////
  // MIDI TESTING
  // Connect a loopback cable between the MIDI IN and MIDI OUT on the
  // GTA Pro.  This test code will periodically send MIDI events which
  // will loop back and get printed in the Serial Monitor.
  ///////////////////////////////////////////////////////////////////////
  DataByte note, velocity, channel, d1, d2;

  // Send MIDI OUT
  int cc, val=0xA, channelSend = 1;
  for (cc=32; cc<40; cc++) {
    MIDI.sendControlChange(cc, val, channelSend); val++; channelSend++;
    delay(100);
    MIDI.sendNoteOn(10, 100, channelSend);
    delay(100);
  }

  if (MIDI.read()) {                    // Is there a MIDI message incoming ?
    MidiType type = MIDI.getType();
    Serial.println(String("MIDI IS WORKING!!!"));
    switch (type) {
      case NoteOn:
        note = MIDI.getData1();
        velocity = MIDI.getData2();
        channel = MIDI.getChannel();
        if (velocity > 0) {
          Serial.println(String("Note On:  ch=") + channel + ", note=" + note + ", velocity=" + velocity);
        } else {
          Serial.println(String("Note Off: ch=") + channel + ", note=" + note);
        }
        break;
      case NoteOff:
        note = MIDI.getData1();
        velocity = MIDI.getData2();
        channel = MIDI.getChannel();
        Serial.println(String("Note Off: ch=") + channel + ", note=" + note + ", velocity=" + velocity);
        break;
      default:
        d1 = MIDI.getData1();
        d2 = MIDI.getData2();
        Serial.println(String("Message, type=") + type + ", data = " + d1 + " " + d2);
    }
    t = millis();
  }

  // If no MIDI IN activity, print a message every 10 seconds
  if (millis() - t > 10000) {
    t += 10000;
    Serial.println("(no MIDI activity, check cables)");
  }

  // Toggle the USR LED state
  usrLEDState = ~usrLEDState;
  digitalWrite(usrLED, usrLEDState);

}
If all goes well, the Serial Monitor will display information about the MIDI messages being sent and received on the MIDI I/O ports. Assuming all’s well with the sketch above, let’s go further into the TGA Pro shield.
Code Library: Audio
As mentioned there’s an extensive collection of libraries for the Teensy. One in particular is of interest to us: Audio. Download, compress, and install the library into the Arduino IDE.
There are lots of Example sketches available with the library. Take a look at them under the File->Example->Audio menu. Speifically, let’s look at the File->Example->Audio->Synthesis->Guitar sketch. This sketch will simulate the strumming of guitar chords!!
Before looking at the code, keep in mind that the Audio library knows nothing about the TGA Pro board. Rather it’s written for one of the audio shields sold by the Teensy folks. So you are going to want to modify the code slightly to use the codec that’s on the TGA-Pro audio shield. Recall from our Try Me First sketch in the BAGuitar Library, the code instantiated our codec using the following line of code:
AudioControlWM8731 codecControl; // needed to enable the codec
In the Guitar Sketch, it’s assuming that we have a diffent codec:
AudioControlSGTL5000 sgtl5000_1;
Replacing our codec instantiations and all instances of sgl5000_1 with codeControl should make this sketch compatible with the TGA Pro Guitar shield.
Now that we’re using our codec, let’s also discuss the general concepts of the Teensy Audio library. I strongly recommend a visit the the documentation. In general, the Audio library starts by creating Audio objects and linking them in a processing chain. There’s even a GUI tool that will allow you to draw the flow of objects, link them together, and export the code for your sketch!
Using the GUI and exporting the sketch, we’d get the following code:
AudioSynthKarplusStrong  string1;
AudioSynthKarplusStrong  string2;
AudioSynthKarplusStrong  string3;
AudioSynthKarplusStrong  string4;
AudioSynthKarplusStrong  string5;
AudioSynthKarplusStrong  string6;
AudioMixer4              mixer1;
AudioMixer4              mixer2;
AudioOutputI2S           i2s1;
AudioConnection          patchCord1(string1, 0, mixer1, 0);
AudioConnection          patchCord2(string2, 0, mixer1, 1);
AudioConnection          patchCord3(string3, 0, mixer1, 2);
AudioConnection          patchCord4(string4, 0, mixer1, 3);
AudioConnection          patchCord5(mixer1, 0, mixer2, 0);
AudioConnection          patchCord6(string5, 0, mixer2, 1);
AudioConnection          patchCord7(string6, 0, mixer2, 2);
AudioConnection          patchCord8(mixer2, 0, i2s1, 0);
AudioConnection          patchCord9(mixer2, 0, i2s1, 1);
The tool also supports importing code and rendering a patch graph (although, I think that may not be working properly).
Our flow-graph looks like:
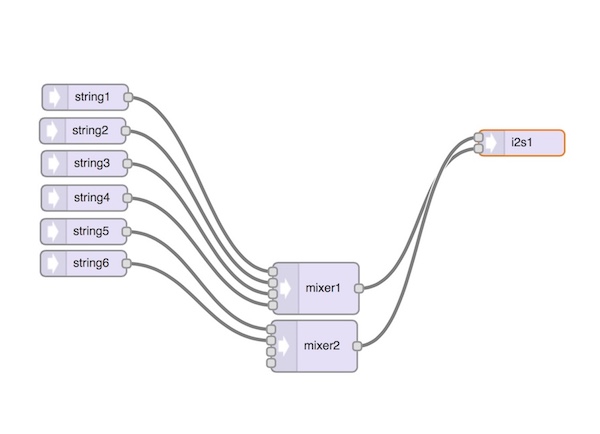
The rest of our sketch is just like any ordinary arduino sketch. We define a setup() and a loop() function and we’re done!
The setup() function allocates Audio memory, sets the mixer gains, and initializes the codec.
The loop() function is where the action is. Basically, the loop strums through a chord progression. But what’s a chord? Take a look at the chords.h header file and you’ll demystify what’s actually going on. Here’s a sample from the header file.
const float Cmajor[6] = { 0, NOTE_C3, NOTE_E3, NOTE_G3, NOTE_C4, NOTE_E4}; // C - E - G
and Notes are defined above as:
#define NOTE_E2   82.41
#define NOTE_F2   87.31
#define NOTE_Fs2  92.50
#define NOTE_G2   98.00
#define NOTE_Gs2 103.82
...
So basically we create an array of audio frequencies that comprise a note! The functions strum_up and strum_down turn on and off the notes that are defined in the cord with a given delay and velocity to synthesis the guitar strumming sound.
The full sketch is below:
#include <Audio.h>
#include <Wire.h>
#include <SD.h>
#include <SPI.h>
#include <SerialFlash.h>

#include "chords.h"

// Special thanks to Matthew Rahtz - http://amid.fish/karplus-strong/

AudioSynthKarplusStrong  string1;
AudioSynthKarplusStrong  string2;
AudioSynthKarplusStrong  string3;
AudioSynthKarplusStrong  string4;
AudioSynthKarplusStrong  string5;
AudioSynthKarplusStrong  string6;
AudioMixer4              mixer1;
AudioMixer4              mixer2;
AudioOutputI2S           i2s1;
AudioConnection          patchCord1(string1, 0, mixer1, 0);
AudioConnection          patchCord2(string2, 0, mixer1, 1);
AudioConnection          patchCord3(string3, 0, mixer1, 2);
AudioConnection          patchCord4(string4, 0, mixer1, 3);
AudioConnection          patchCord5(mixer1, 0, mixer2, 0);
AudioConnection          patchCord6(string5, 0, mixer2, 1);
AudioConnection          patchCord7(string6, 0, mixer2, 2);
AudioConnection          patchCord8(mixer2, 0, i2s1, 0);
AudioConnection          patchCord9(mixer2, 0, i2s1, 1);
//AudioControlSGTL5000     sgtl5000_1;
AudioControlWM8731      codecControl; // needed to enable the codec

const int finger_delay = 5;
const int hand_delay = 220;

int chordnum=0;

void setup() {
  AudioMemory(15);
  codecControl.enable();
  codecControl.volume(0.6);
  mixer1.gain(0, 0.15);
  mixer1.gain(1, 0.15);
  mixer1.gain(2, 0.15);
  mixer1.gain(3, 0.15);
  mixer2.gain(1, 0.15);
  mixer2.gain(2, 0.15);
  delay(700);
}

void strum_up(const float *chord, float velocity);
void strum_dn(const float *chord, float velocity);

void loop() {
  const float *chord;

  // each time through the loop, play a different chord
  if (chordnum == 0) {
    chord = Cmajor;
    Serial.println("C major");
    chordnum = 1;
  } else if (chordnum == 1) {
    chord = Gmajor;
    Serial.println("G major");
    chordnum = 2;
  } else if (chordnum == 2) {
    chord = Aminor;
    Serial.println("A minor");
    chordnum = 3;
  } else {
    chord = Eminor;
    Serial.println("E minor");
    chordnum = 0;
  }

  // then strum the 6 string several times
  strum_up(chord, 1.0);
  delay(hand_delay);
  delay(hand_delay);
  strum_up(chord, 1.0);
  delay(hand_delay);
  strum_dn(chord, 0.8);
  delay(hand_delay);
  delay(hand_delay);
  strum_dn(chord, 0.8);
  delay(hand_delay);
  strum_up(chord, 1.0);
  delay(hand_delay);
  strum_dn(chord, 0.8);
  delay(hand_delay);
  strum_up(chord, 1.0);
  delay(hand_delay);
  delay(hand_delay);
  strum_up(chord, 1.0);
  delay(hand_delay);
  strum_dn(chord, 0.7);
  delay(hand_delay);
  delay(hand_delay);
  strum_dn(chord, 0.7);
  delay(hand_delay);
  strum_up(chord, 1.0);
  delay(hand_delay);
  strum_dn(chord, 0.7);
  delay(hand_delay);

  Serial.print("Max CPU Usage = ");
  Serial.print(AudioProcessorUsageMax(), 1);
  Serial.println("%");
}

void strum_up(const float *chord, float velocity)
{
  if (chord[0] > 20.0) string1.noteOn(chord[0], velocity);
  delay(finger_delay);
  if (chord[1] > 20.0) string2.noteOn(chord[1], velocity);
  delay(finger_delay);
  if (chord[2] > 20.0) string3.noteOn(chord[2], velocity);
  delay(finger_delay);
  if (chord[3] > 20.0) string4.noteOn(chord[3], velocity);
  delay(finger_delay);
  if (chord[4] > 20.0) string5.noteOn(chord[4], velocity);
  delay(finger_delay);
  if (chord[5] > 20.0) string6.noteOn(chord[5], velocity);
  delay(finger_delay);
}

void strum_dn(const float *chord, float velocity)
{
  if (chord[5] > 20.0) string1.noteOn(chord[5], velocity);
  delay(finger_delay);
  if (chord[4] > 20.0) string2.noteOn(chord[4], velocity);
  delay(finger_delay);
  if (chord[3] > 20.0) string3.noteOn(chord[3], velocity);
  delay(finger_delay);
  if (chord[2] > 20.0) string4.noteOn(chord[2], velocity);
  delay(finger_delay);
  if (chord[1] > 20.0) string5.noteOn(chord[1], velocity);
  delay(finger_delay);
  if (chord[0] > 20.0) string6.noteOn(chord[0], velocity);
  delay(finger_delay);
}
MIDI Mania!
All of the processing above was done using the codec. But what if we want to receive or send MIDI messages? How can we use the TGA-Pro to interact with the MIDI protocol?
First you have to understand that MIDI is nothing more than a serial bus protocol that defines messages that describe musical objects and properties. To actually make sound, we still need to drive frequencies through and audio codec!
Basic MIDI with the TGA Pro Shield
The most basic MIDI processing to consider using the TGA Pro shield is receiving MIDI messages on the shield through the MIDI input port
Let’s take a look at how we might write a sketch to display incoming MIDI messages.
Before we describe our setup and loop functions, we need to first include the MIDI.h header file for the MIDI library, and then create a MIDI instance. MIDI_CREATE_INSTANCE(HardwareSerial, Serial1, MIDI); For more information in the parameters, see the documentation in the MIDI Library.
Now that we’ve established our MIDI instance, we can setup that instance by calling MIDI.begin(MIDI_CHANNEL_OMNI); We’re all set to process MIDI on our instance. So let’s jump to our loop function. Here we check to see if there’s a MIDI message ready to be read, and if so we get the message type and extract the MIDI object and property information so we can write it to the Serial Monitor screen.
So all this does is demonstrate that we’re getting MIDI messages from our MIDI device. But wait, where’s the sound? There is no sound. That only occurs when you render the messages and process it through and audio processor (like a codec). More on that next.
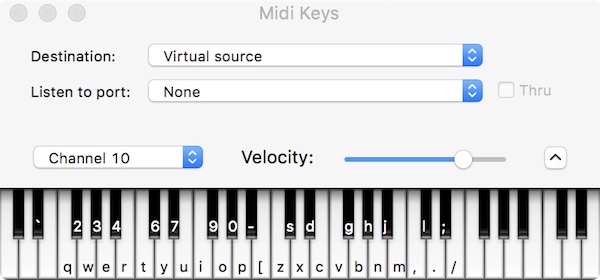
But first, even getting this sketch to properly receive MIDI messages may be a challenge depending on how you connect your MIDI devices to the input. If you’re using a Mac for example, you may need to use the Audio MIDI Setup application. Or, you might be able to simplify things by using an application like MidiKeys that allows you to select where to send the MIDI output.
#include <MIDI.h>

MIDI_CREATE_INSTANCE(HardwareSerial, Serial1, MIDI);

void setup() {
  MIDI.begin(MIDI_CHANNEL_OMNI);
  Serial.begin(57600);
  Serial.println("MIDI Input Test");
}

unsigned long t=0;

void loop() {
  int type, note, velocity, channel, d1, d2;
  //Serial.println("waiting for MIDI msg...");
  if (MIDI.read()) {                    // Is there a MIDI message incoming ?
    Serial.println("got a MIDI msg...");
    byte type = MIDI.getType();
    switch (type) {
      case midi::NoteOn:
        note = MIDI.getData1();
        velocity = MIDI.getData2();
        channel = MIDI.getChannel();
        if (velocity > 0) {
          Serial.println(String("Note On:  ch=") + channel + ", note=" + note + ", velocity=" + velocity);
        } else {
          Serial.println(String("Note Off: ch=") + channel + ", note=" + note);
        }
        break;
      case midi::NoteOff:
        note = MIDI.getData1();
        velocity = MIDI.getData2();
        channel = MIDI.getChannel();
        Serial.println(String("Note Off: ch=") + channel + ", note=" + note + ", velocity=" + velocity);
        break;
      default:
        d1 = MIDI.getData1();
        d2 = MIDI.getData2();
        Serial.println(String("Message, type=") + type + ", data = " + d1 + " " + d2);
    }
    t = millis();
  }
  if (millis() - t > 10000) {
    t += 10000;
    Serial.println("(inactivity)");
  }
}
MIDI + Sound
We demonstrated how to receive MIDI messages and print the objects and properties of those messages to the Serial Monitor, but that’s not too exciting. Let’s next look at how we might make some sound from those messages.
In order to make our MIDI messages render, we’ll need to look at yet another library - Wavetable-Synthesis. This library does a lot of cool things that result in producing sound from our MIDI messages. There are two key features of the library:
- Soundfont decoding.
- Wavetable class object.
What’s a soundfont? Just as the name implies, it’s a collection of sound samples and properties that describe an instrument and its corresponding sounds at certain notes in the MIDI protocol. We can think of a soundfont no differently than a character font for printing. Depending on the style of the writing, we can select the font that best conveys the tone of our printing (okay, pun intended!!).
Next, the library defines a Wavetable class library that manipulates these objects and lets us render them to an audio processor. In order to understand how to use the Wavetable class, it’s imperative that you review the documentation. It’s extensive and well worth the reading!
Assuming you’ve read the docs, take a look at the repo I wrote that modifies an example sketch to use it with the TGA-Pro. Program the Teensy with this sketch, connect your MidiKeys application to the input of the TGA-Pro shield, and listen to the sound rendered out of the TGA-Pro OUTPUT port!