
NFC Tagboard - Using NFC Tags, Grafana, and Docker
NFC Tags - Tracking tasks last completed
Trying to track when you last completed a long-dated task can be challenging. Writing them on a calendar makes for difficult searching. Heavy apps are overkill. So what’s a person to do? A simple soltution - use NFC tags which are pre-loaded with custom JSON, drop a little golang server, and Docker persistance with MySQL, along with a Grafana UI to easily manage tracking of tasks.
The setup - Six Easy Steps!
So what do we need to do?
- setup a Docker environment for our App and Database
- write a golang application server to receive and procedss REST POST requests
- configure Grafana Data Source, Panels, and Queries to visual our data
- write database migrations for our application
- configure the iPhone NFC App to communicate with our golang app
- write our JSON data to our NFC tags
Docker
We need to setup a docker environment, both for our application as well as our persistant store. In this case, we’re going to use MySQL. Additionally, we’re going to use the hot-loading application air that lets of modify and reload our application dynamically into our container. Below is the Dockerfile and docker-compose.yml file for our app and database:
Dockerfile:
FROM golang:1.17 as base

FROM base as dev

RUN curl -sSfL https://raw.githubusercontent.com/cosmtrek/air/master/install.sh | sh -s -- -b $(go env GOPATH)/bin

WORKDIR /opt/app/api
CMD ["air"]
docker-compose.yml
version: "3.9"
services:
  app:
    build:
      dockerfile: Dockerfile
      context: .
      target: dev
    volumes:
      - .:/opt/app/api
    environment:
      API_SERVER_ADDR: ":7777"
    ports:
    - "7777:7777"

  mysql:
    image: mysql/mysql-server:latest-aarch64
    ports:
      - 3306:3306
    volumes:
      - mysql-data:/var/lib/mysql
    environment:
      MYSQL_ROOT_PASSWORD: 'secret'
      MYSQL_DATABASE: 'db'
      MYSQL_USER: 'user'
      MYSQL_PASSWORD: 'pass'
        # be sure to -> GRANT ALL ON *.* TO 'user'@'%';
volumes:
  mysql-data:
To kick things off, we will need to execute the following in bash:
docker compose build
docker compose run --rm app go mod init github.com/rabarar/server
docker compose run --rm app air init
docker compose run --rm app go mod tidy
Once completed, we’ll have our containers for both our app as well as our MySQL instance. One thing to keep in mind, I was a bit lazy here. I should have added an additional section in our services.app: section, namely environment. Instead, I hard-coded these values in my golang application.
Two approaches to solve this: first, add the environment variables in the docker-compose.yml file like such:
    environment:
      MYSQL_HOST: mysql
      MYSQL_USER: root
      MYSQL_PASSWORD: secret
      MYSQL_DB: todos
But that also should leave a sour taste in your mouth - these values are exposed! A better solution is to place these into an environments file and make that file read-only, and then reference the file in our docker-compose.yml file. I’ll leave that as an exercise to the reader. Regardless of which solution you chose, you’ll also need to read those environment variables in our golang app to access the database information and establish the connection to the database.
Golang App
Our application is quite simple. It needs to:
- establish a connection to the database
- start an http server and register a callback to handle the POST RESTfull method
- write the data received in the POST to the MySQL database
The code to do all that is below:
package main

import (
        "database/sql"
        "fmt"
        "os"
        "os/signal"
        "syscall"
        "time"

        "context"
        "encoding/json"
        "errors"
        "net/http"

        "github.com/gorilla/mux"

        _ "github.com/go-sql-driver/mysql"
        "github.com/sirupsen/logrus"
        "github.com/urfave/cli/v2"
)

const (
        apiServerAddrFlagName string = "addr"
)

var defaultStopTimeout = time.Second * 30

type APIServer struct {
        addr string
}

func NewAPIServer(addr string) (*APIServer, error) {
        if addr == "" {
                return nil, errors.New("addr cannot be blank")
        }

        return &APIServer{
                addr: addr,
        }, nil
}

// Start starts a server with a stop channel
func (s *APIServer) Start(stop <-chan struct{}) error {
        srv := &http.Server{
                Addr:    s.addr,
                Handler: s.router(),
        }

        go func() {
                logrus.WithField("addr", srv.Addr).Info("starting server")
                if err := srv.ListenAndServe(); err != nil && err != http.ErrServerClosed {
                        logrus.Fatalf("listen: %s\n", err)
                }
        }()

        <-stop
        ctx, cancel := context.WithTimeout(context.Background(), defaultStopTimeout)
        defer cancel()

        logrus.WithField("timeout", defaultStopTimeout).Info("stopping server")
        return srv.Shutdown(ctx)
}

func (s *APIServer) router() http.Handler {
        router := mux.NewRouter()

        router.HandleFunc("/", s.defaultRoute)
        return router
}

func (s *APIServer) defaultRoute(w http.ResponseWriter, r *http.Request) {
        w.WriteHeader(http.StatusOK)
        if r.Header.Get("Content-type") == "application/x-www-form-urlencoded" {
                r.ParseForm()
                fmt.Println("\nrequest.PostForm::")
                for key, value := range r.PostForm {
                        fmt.Printf("Key:%s, Value:%s\n", key, value[0])
                        // NFC Key will be  the user and the Value will be a JSON object containging
                        // nfc_id and default notes

                        var nfc_task Nfc_task
                        err := json.Unmarshal([]byte(value[0]), &nfc_task)
                        if err != nil {
                                fmt.Printf("Error json.Unmarshall: %s\n", err)
                                return
                        } else {
                                fmt.Printf("NFC_Id = %s, NFC_Desc = %s\n", nfc_task.Nfc_Id, nfc_task.Default_desc)

                                sqlStatement, err := db.Prepare("INSERT INTO nfc_task (nfc_id, owner, notes, date) VALUES (?, ?, ?, ?);")
                                if err != nil {
                                        //
                                        fmt.Printf("error in db Prepare: %s\n", err)
                                        return
                                }
                                res, err := sqlStatement.Exec(nfc_task.Nfc_Id, key, nfc_task.Default_desc, time.Now())
                                if err != nil {
                                        fmt.Printf("error in db Exec: %s\n", err)
                                        return
                                }
                                rowCount, err := res.RowsAffected()
                                if err != nil {
                                        fmt.Printf("error in db RowsAffected: %s\n", err)
                                        return
                                } else {
                                        fmt.Printf("Inserted %d row(s) of data.\n", rowCount)
                                }
                        }
                }
        } else {
                w.WriteHeader(http.StatusUnsupportedMediaType)
                w.Write([]byte("415 - Unsupported Media Type. Only JSON files are allowed" + r.Header.Get("Content-type")))
                return
        }
}

type Nfc_task struct {
        Nfc_Id       string `json:"id"`
        Default_desc string `json:"desc"`
}

var db *sql.DB

func dbConn() (db *sql.DB) {
        dbDriver := "mysql"
        user := "robert"
        password := "foobar"
        host := "192.168.1.156"
        database := "maint10402"

        var connectionString = fmt.Sprintf("%s:%s@tcp(%s:3306)/%s?allowNativePasswords=true", user, password, host, database)
        db, err := sql.Open(dbDriver, connectionString)
        if err != nil {
                panic(err.Error())
        }
        return db
}

func main() {

        db = dbConn()
        defer db.Close()
        logrus.WithField("addr", ":0").Info("opened DB connection")
        if err := app().Run(os.Args); err != nil {
                logrus.WithError(err).Fatal("could not run application")
        }
}

func app() *cli.App {
        return &cli.App{
                Name:  "api-server",
                Usage: "The API",
                Commands: []*cli.Command{
                        apiServerCmd(),
                },
        }
}

func apiServerCmd() *cli.Command {
        return &cli.Command{
                Name:  "start",
                Usage: "starts the API server",
                Flags: []cli.Flag{
                        &cli.StringFlag{Name: apiServerAddrFlagName, EnvVars: []string{"API_SERVER_ADDR"}},
                },
                Action: func(c *cli.Context) error {
                        done := make(chan os.Signal, 1)
                        signal.Notify(done, os.Interrupt, syscall.SIGINT, syscall.SIGTERM)

                        stopper := make(chan struct{})
                        go func() {
                                <-done
                                close(stopper)
                        }()

                        addr := c.String(apiServerAddrFlagName)
                        server, err := NewAPIServer(addr)
                        if err != nil {
                                return err
                        }

                        return server.Start(stopper)
                },
        }
}
Let’s disect the code in sections giving some insight as to what’s going on. Take a look at the main and work backwards:
func main() {

    db = dbConn()
    defer db.Close()
    logrus.WithField("addr", ":0").Info("opened DB connection")
    if err := app().Run(os.Args); err != nil {
        logrus.WithError(err).Fatal("could not run application")
    }
}
Here we make use of github.com/urfave/cli/v2 cli to wrap our app, its arguments, enviornment, and commands. We also use "github.com/sirupsen/logrus" for logging. For our server, we need to import a multiplexor handler for our server requests, so we include "github.com/gorilla/mux" in addition to the stock "net/http".
Lastly, we need two other imports to access MySQL from our program:
"github.com/go-sql-driver/mysql""database/sql"
With these packages, we simply conenct to the database and start the application. If you’re interested in learning more, read the godocs for these packages and take a look at some example applications.
Let’s dive into the application:
func app() *cli.App {
        return &cli.App{
                Name:  "api-server",
                Usage: "The API",
                Commands: []*cli.Command{
                        apiServerCmd(),
                },
        }
}
Again, using the clipackage we can create an App that will have one command: apiServerCmd().
func apiServerCmd() *cli.Command {
        return &cli.Command{
                Name:  "start",
                Usage: "starts the API server",
                Flags: []cli.Flag{
                        &cli.StringFlag{Name: apiServerAddrFlagName, EnvVars: []string{"API_SERVER_ADDR"}},
                },
                Action: func(c *cli.Context) error {
                        done := make(chan os.Signal, 1)
                        signal.Notify(done, os.Interrupt, syscall.SIGINT, syscall.SIGTERM)

                        stopper := make(chan struct{})
                        go func() {
                                <-done
                                close(stopper)
                        }()

                        addr := c.String(apiServerAddrFlagName)
                        server, err := NewAPIServer(addr)
                        if err != nil {
                                return err
                        }

                        return server.Start(stopper)
                },
        }
}
Again, more scaffolding to make our app production-ready. You can follow all of this scaffolding back to the handler.
func (s *APIServer) defaultRoute(w http.ResponseWriter, r *http.Request) {
        w.WriteHeader(http.StatusOK)
        if r.Header.Get("Content-type") == "application/x-www-form-urlencoded" {
                r.ParseForm()
                fmt.Println("\nrequest.PostForm::")
                for key, value := range r.PostForm {
                        fmt.Printf("Key:%s, Value:%s\n", key, value[0])
                        // NFC Key will be  the user and the Value will be a JSON object containging
                        // nfc_id and default notes

                        var nfc_task Nfc_task
                        err := json.Unmarshal([]byte(value[0]), &nfc_task)
                        if err != nil {
                                fmt.Printf("Error json.Unmarshall: %s\n", err)
                                return
                        } else {
                                fmt.Printf("NFC_Id = %s, NFC_Desc = %s\n", nfc_task.Nfc_Id, nfc_task.Default_desc)

                                sqlStatement, err := db.Prepare("INSERT INTO nfc_task (nfc_id, owner, notes, date) VALUES (?, ?, ?, ?);")
                                if err != nil {
                                        //
                                        fmt.Printf("error in db Prepare: %s\n", err)
                                        return
                                }
                                res, err := sqlStatement.Exec(nfc_task.Nfc_Id, key, nfc_task.Default_desc, time.Now())
                                if err != nil {
                                        fmt.Printf("error in db Exec: %s\n", err)
                                        return
                                }
                                rowCount, err := res.RowsAffected()
                                if err != nil {
                                        fmt.Printf("error in db RowsAffected: %s\n", err)
                                        return
                                } else {
                                        fmt.Printf("Inserted %d row(s) of data.\n", rowCount)
                                }
                        }
                }
        } else {
                w.WriteHeader(http.StatusUnsupportedMediaType)
                w.Write([]byte("415 - Unsupported Media Type. Only JSON files are allowed" + r.Header.Get("Content-type")))
                return
        }
}
Out handler processes a "application/x-www-form-urlencoded". The handler ParseForm and ranges through to get the key and value from the forms that is being sent from the iPhone POST. The key interestingly enough is whatever you’d like to specify. And the value is the body of the NFC tag. So, I decided to make the key a user’s name, and the value would be a JSON structure specifying the tag information, like the following:
{
"nfc_id":"1",
"desc": "successfully changed the water filter"
}
Keep in mind, that the golang datastructure names use tags which aren’t the same names as the MySQL database table names:
type Nfc_task struct {
        Nfc_Id       string `json:"id"`
        Default_desc string `json:"desc"`
}
We’ll insert our values as follows:
 sqlStatement, err := db.Prepare("INSERT INTO nfc_task (nfc_id, owner, notes, date) VALUES (?, ?, ?, ?);")
                                if err != nil {
                                        //
                                        fmt.Printf("error in db Prepare: %s\n", err)
                                        return
                                }
                                res, err := sqlStatement.Exec(nfc_task.Nfc_Id, key, nfc_task.Default_desc, time.Now())
                                if err != nil {
                                        fmt.Printf("error in db Exec: %s\n", err)
                                        return
                                }
Again, there should be more error processing, validation of POST data, and appropriate response codes back to the app on error or success, but given that the app is shoot-fire-forget, and this is a complete and utter hack it is what it is!
Grafana Integration
Our grafana integration will require that we add a plugin. Grafana doesn’t support the needed datatable panel out of the box. In order to use it, we need to add it from the command line. Here I am assuming you have a Grafana instance (hopefully in a docker compose service container!).
$grafana-cli plugins install datatable
Create a new Dashboard, add a panel and then make the visualizastion datatable. Now we need to configure the panel’s data source. Here again, we’re going to assume you’ve already added the MySQL data source to Grafana. If not, plenty of guides online to do that. We modify our panel’s datasource by adding a query and formatting as Table. We’ll have to panels. One showing tasking, and one showing all of our defined tags.
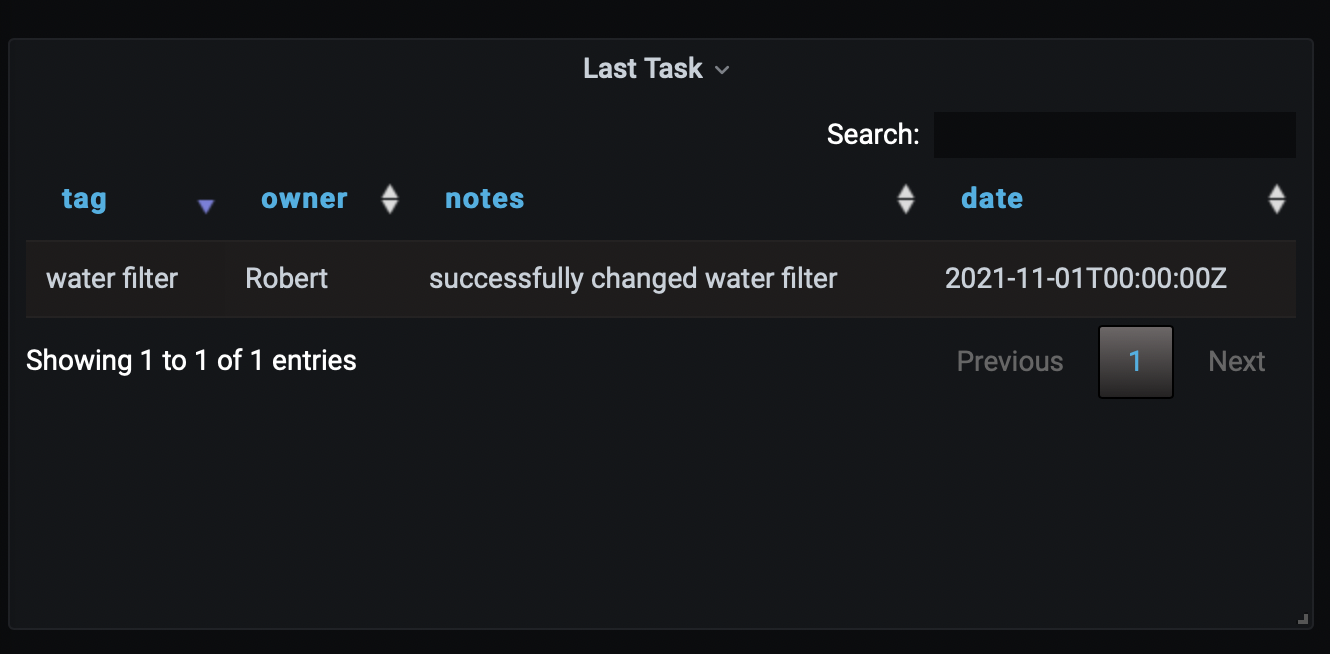
Here’s the query for the Tasking panel:
select nfc_tag.tag_name as tag,
	nfc_task.owner,
	nfc_task.notes,
	nfc_task.date
	FROM nfc_tag inner join
		nfc_task on nfc_tag.id = nfc_task.nfc_id
	order by date
And here’s the rendering of the Task Table once the query’s loaded:
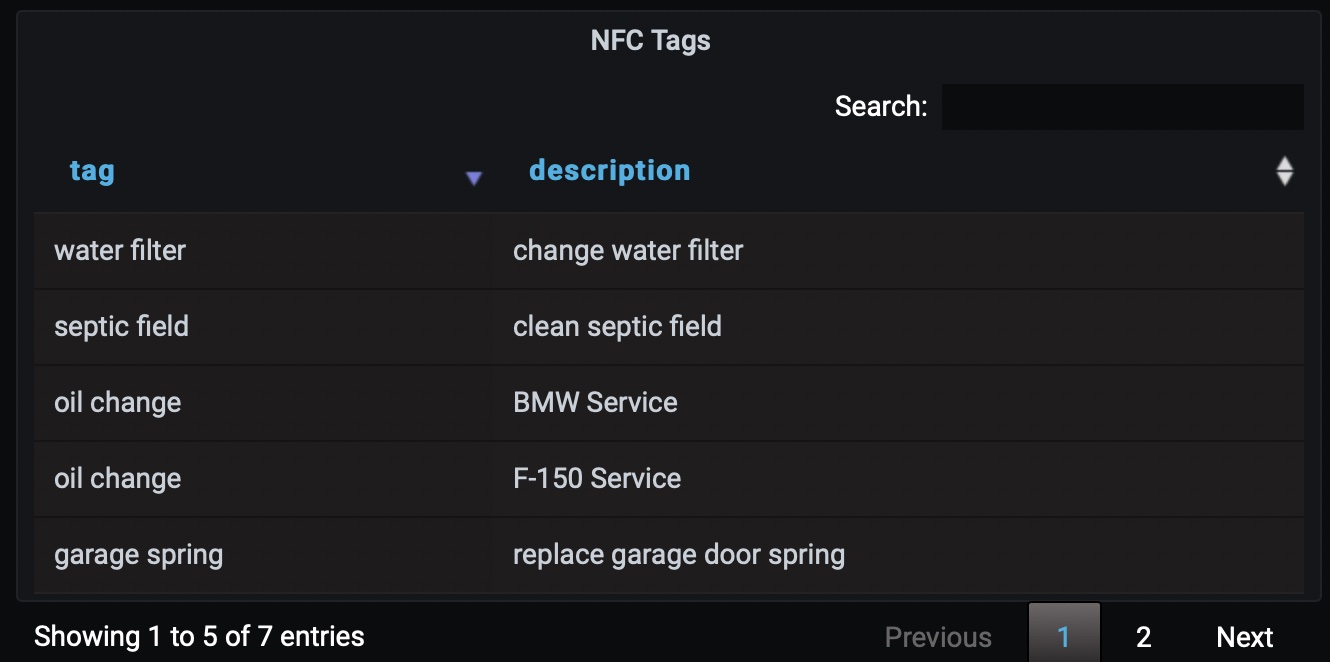
And the Tags Table:
iPhone Setup
Setting up the iPhone is quite simple. Download the Simply NFC app from the app store. Although there are serveral apps that you can use to read and write NFC tags, this app lets us send REST API requests thereby allowing us to send data to a server of our choosing. The app also lets us write NFC tags with different record formats. For our applications, we’ll simply write a text record containing a JSON string.
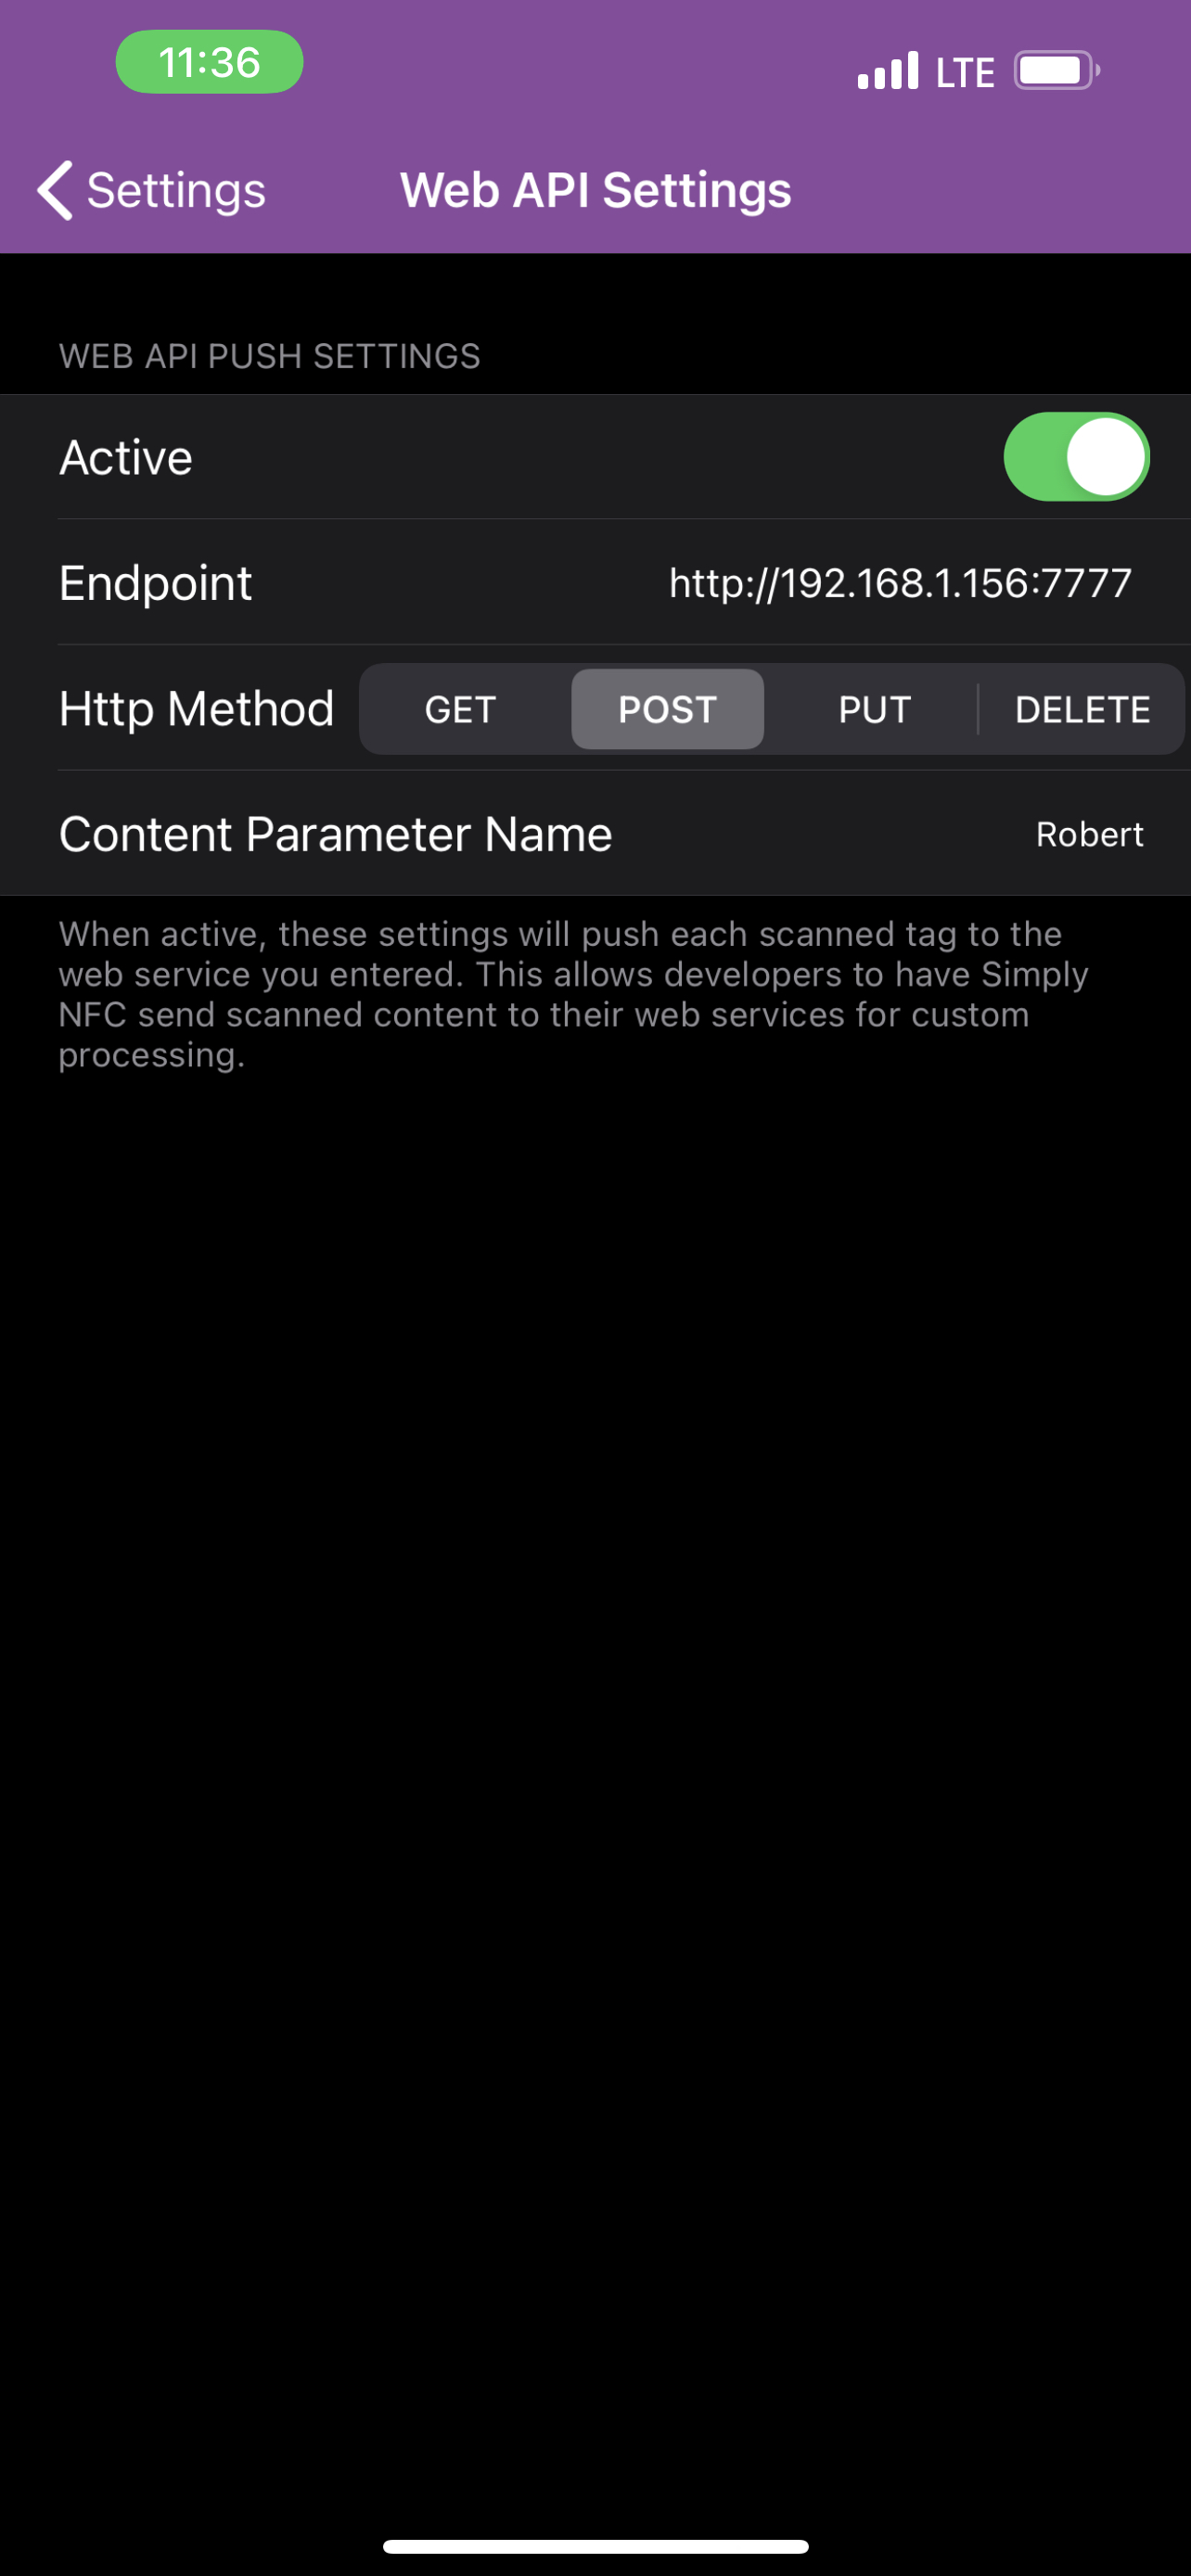
Notice we can toggle sending the API with the button at the top of the screen. The endpoint is a URL of our server. And for HTTP Method, I chose to send a POST. Lastly, the Content Parameter Name is the key in the Form Post. I set this to the user who’s sending the POST request. And the value will be the contents of the JSON string in the tag. This way, if multiple users each specify their name, we can easily distiguish between users posting tasks to our server. The interface for reading and writing tags is very straight-forward so I won’t belabor the point here.
MySQL Migration with dbmate
Lastly, we need to discuss how we prepare the database for our application. Aftert we stand up the database, we’ll need to create roles, tables, accesses, and load default values into tables to initialize our application. Instead of writing a script, or worse still, doing it by hand, we can use a nice tool that automates the creation (and rollback) of database entities. Enter dbmate. Dbmate is a database migration tool, to keep your database schema in sync across multiple developers and your production servers.
It is a standalone command line tool, which can be used with Go, Node.js, Python, Ruby, PHP, or any other language or framework you are using to write database-backed applications. This is especially helpful if you are writing many services in different languages, and want to maintain some sanity with consistent development tools.
We can install it using brew. Or you can run it out of a Docekr container. I think using it locally is the best bet.
$brew install dbmate
Here are some of the commands available
dbmate --help    # print usage help
dbmate new       # generate a new migration file
dbmate up        # create the database (if it does not already exist) and run any pending migrations
dbmate create    # create the database
dbmate drop      # drop the database
dbmate migrate   # run any pending migrations
dbmate rollback  # roll back the most recent migration
dbmate down      # alias for rollback
dbmate status    # show the status of all migrations (supports --exit-code and --quiet)
dbmate dump      # write the database schema.sql file
dbmate wait      # wait for the database server to become available
Unless we specify a URL for the database connection string, dbmate assumes the environment variable DATABASE_URL is set. The URL should fully specify the database connection and look like:
protocol://username:password@host:port/database_name?options
So, with this tool, we can create our database, tables, etc. Good luck! Go Task!