
Program the Esp32 with ESP-IDF on Mac OS X
Programming the ESP32 on your Mac!
Go out and buy yourself a cheap little ESP32 SoC and follow these basic instructions to setup your development environment on your Mac. If you want to do some advanced C-programming to control your ESP32, this is for you. If you’d rather use Arduino and play with simple sketches then this is not for you – google how to use Arduino and off you go!
What you will need
So, of course you’ll need an ESP32 SoC development board. I recommend the SparkFun Thing. Lots of other choices, but this blog post will address some of the specific configuration considerations that you’ll need to be aware of when you select this particular device.
The other items needed are the software development kit (SDK) from Espressif and a toolchain that will compile, build, and link your code. You can get each of these here:
- xtensia gcc toolchain
- Espressif IDF SDK
- virtualenvwrapper
- Serial Terminal Application such as
screen(1).
If using screen(1) isn’t your cup of tea, another nice alternative is a serial terminal tool available in the Apple Store called Serial. This serial terminal tool is polished and makes your terminal experience pain-free.
So, now that we have all the tools that we need, let’s get started. If you’re not familiar with virtualenvwrapper, take a look, install it, and let’s use it to manage our python environment. The ESP-IDF tools will leverage python to do some of its tasks.
Step 1
Install virtualenvwrapper and create a virtual environment named esp32, and activate it
$ pip install virtualenvwrapper
$ mkvirtualenv -p `which python3` esp32

...

$ workon esp32
(esp32)  $

...
Step 2
Install the xtensia gcc toolchain
Before installing the toolchain, let’s create a working directory where we’ll install everything. For example, in your home directory, create a directory called esp32. Change into that directory and let’s go!
Download the toolchain from the link above and untar irt:
tar -xzf ~/Downloads/xtensa-esp32-elf-osx-1.22.0-80-g6c4433a-5.2.0.tar.gz
Next, we need to add the path to the tools to our PATH.
export PATH=$HOME/esp32/xtensa-esp32-elf/bin:$PATH
Next, let’s install the ESP-IDF (Software Development Environment). We can install it from the link above. Or if you’d prefer, we can install it from the Github repo:
$ cd ~/esp32
$ git clone --recursive https://github.com/espressif/esp-idf.git
$ export IDF_PATH=$HOME/esp32/esp-idf
You may want to add both of the exports to your shell’s profile so that your terminal will have the environment variables set when you’re going to build your projects. Forgetting to set one or both is gonna make for a bad day!
Finally, with the toolchain and the SDK installed, and in our virtualenv, let’s install the required python components:
(esp32) $ python -m pip install --user -r $IDF_PATH/requirements.txt
Let’s Take it for a Spin!
Okay, we’ve installed and configured our environment and now we’re ready to give it a try! Plug in your ESP32 device into your USB port and let’s look at the most basic example. Change into the following directory:
(esp32) $ cd $IDF_PATH/examples/get-started/hello_world
Looking around, we see the following files:
(esp32) $ ls
CMakeLists.txt Makefile       README.md      build          main           sdkconfig
Inside the main directory you will find the source file, hello_world_main.c with the following code:
/* Hello World Example

   This example code is in the Public Domain (or CC0 licensed, at your option.)

   Unless required by applicable law or agreed to in writing, this
   software is distributed on an "AS IS" BASIS, WITHOUT WARRANTIES OR
   CONDITIONS OF ANY KIND, either express or implied.
*/
#include <stdio.h>
#include "freertos/FreeRTOS.h"
#include "freertos/task.h"
#include "esp_system.h"
#include "esp_spi_flash.h"


void app_main()
{
    printf("Hello world!\n");

    /* Print chip information */
    esp_chip_info_t chip_info;
    esp_chip_info(&chip_info);
    printf("This is ESP32 chip with %d CPU cores, WiFi%s%s, ",
            chip_info.cores,
            (chip_info.features & CHIP_FEATURE_BT) ? "/BT" : "",
            (chip_info.features & CHIP_FEATURE_BLE) ? "/BLE" : "");

    printf("silicon revision %d, ", chip_info.revision);

    printf("%dMB %s flash\n", spi_flash_get_chip_size() / (1024 * 1024),
            (chip_info.features & CHIP_FEATURE_EMB_FLASH) ? "embedded" : "external");

    for (int i = 10; i >= 0; i--) {
        printf("Restarting in %d seconds...\n", i);
        vTaskDelay(1000 / portTICK_PERIOD_MS);
    }
    printf("Restarting now.\n");
    fflush(stdout);
    esp_restart();
}
A quick look at the code reveals the behavior. We display information about our ESP32 chip, it’s revision, and the amount of Flash. Finally we countdown and reboot. The code will do this repeatedly until we reload our device with a new program.
So, how do we get this, or any other program, into our device? We need to follow these three basic steps:
make menuconfig– configure the build environment that will set values for our compilation, build, and flashmake -j4 all– build the source code in our project directorymake flash– install the built executable onto our device
Let’s walk through each of these steps one at a time. First we’ll configure the build environment using make menuconfig. If you’ve installed all of the tools correctly, you should see something like this when you execute the command:
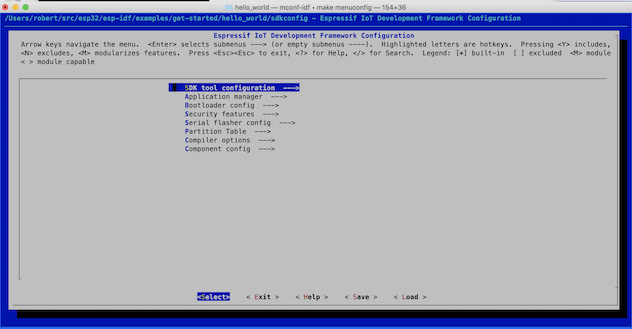
If you’re using the SparkFun Thing, we need to make the following changes to correctly configure the build:
- Serial flasher config –> Default Serial Port
- Component config –> ESP32-specific –> CPU frequency
- Component config –> ESP32-specific –> Main XTAL frequency
When you plug in your device, look in the /dev directory, and you’ll see a device filename like /dev//tty.usbserial-DN028GCB which is the USB-Serial interface to your ESP32 device. Keep in mind, this device name will change when you plug your device into a different USB port. Place that name into the Default Serial Port configuration input.
Next, change the CPU frequency to 240 Mhz for your SparkFun Thing. Lastly, and MOST IMPORTANTLY, set the XTAL frequency to Autodetect. If you fail to do this, the clock divisors will be incorrect and baud rates and wifi clocks will be wrong resulting in code that won’t work!!!
After you’ve made the configuration changes, save your changes in the default sdkconfig (as specified by the filename in the dialog box) and exit the menuconfig back to the shell.
Now that we’ve configured the build, let er rip! You’ll see a ton of compiling, linking, generating, etc…
(eps32) $ make -j4 all
Toolchain path: /Users/robert/src/esp32/xtensa-esp32-elf/bin/xtensa-esp32-elf-gcc
Toolchain version: crosstool-ng-1.22.0-80-g6c4433a
Compiler version: 5.2.0
GENCONFIG
App "hello-world" version: v3.3-beta1-223-ga62cbfec9-dirty
CC build/app_trace/app_trace.o
App "hello-world" version: v3.3-beta1-223-ga62cbfec9-dirty
CC build/app_update/esp_app_desc.o
CC build/app_trace/app_trace_util.o
CC build/app_update/esp_ota_ops.o
Python requirements from /Users/robert/src/esp32/esp-idf/requirements.txt are satisfied.
CC build/app_trace/host_file_io.o
CXX build/asio/asio/asio/src/asio.o
CC build/app_trace/gcov/gcov_rtio.o
AR build/app_update/libapp_update.a
AR build/aws_iot/libaws_iot.a
AR build/app_trace/libapp_trace.a
CC build/bootloader_support/src/bootloader_clock.o
CC build/bootloader_support/src/bootloader_common.o
CC build/bt/bt.o

...

Generating libwifi_provisioning.a.sections_info
Generating libxtensa-debug-module.a.sections_info
AR build/wpa_supplicant/libwpa_supplicant.a
Generating libwpa_supplicant.a.sections_info
Generating esp32.common.ld
LD build/hello-world.elf
esptool.py v2.6-beta1
To flash all build output, run 'make flash' or:
python /Users/robert/src/esp32/esp-idf/components/esptool_py/esptool/esptool.py --chip esp32 --port /dev/ttyUSB0 --baud 115200 --before default_reset --after hard_reset write_flash -z --flash_mode dio --flash_freq 40m --flash_size detect 0x1000 /Users/robert/src/esp32/esp-idf/examples/get-started/hello_world/build/bootloader/bootloader.bin 0x10000 /Users/robert/src/esp32/esp-idf/examples/get-started/hello_world/build/hello-world.bin 0x8000 /Users/robert/src/esp32/esp-idf/examples/get-started/hello_world/build/partitions_singleapp.bin
If everything built successfully, you’ll see the build products in the project build directory. With your device plugged into your USB port, flash the code you built using the make flash command:
(esp32) $ make flash
Toolchain path: /Users/robert/src/esp32/xtensa-esp32-elf/bin/xtensa-esp32-elf-gcc
Toolchain version: crosstool-ng-1.22.0-80-g6c4433a
Compiler version: 5.2.0
Python requirements from /Users/robert/src/esp32/esp-idf/requirements.txt are satisfied.
App "hello-world" version: v3.3-beta1-223-ga62cbfec9-dirty
Flashing binaries to serial port /dev/tty.usbserial-DN028GCB (app at offset 0x10000)...
esptool.py v2.6-beta1
Serial port /dev/tty.usbserial-DN028GCB
Connecting........_
Chip is ESP32D0WDQ6 (revision 0)
Features: WiFi, BT, Dual Core, Coding Scheme None
MAC: 24:0a:c4:00:97:40
Uploading stub...
Running stub...
Stub running...
Configuring flash size...
Auto-detected Flash size: 4MB
Flash params set to 0x0220
Compressed 24304 bytes to 14537...
Wrote 24304 bytes (14537 compressed) at 0x00001000 in 1.3 seconds (effective 150.0 kbit/s)...
Hash of data verified.
Compressed 145904 bytes to 70051...
Wrote 145904 bytes (70051 compressed) at 0x00010000 in 6.2 seconds (effective 187.0 kbit/s)...
Hash of data verified.
Compressed 3072 bytes to 103...
Wrote 3072 bytes (103 compressed) at 0x00008000 in 0.0 seconds (effective 1524.2 kbit/s)...
Hash of data verified.

Leaving...
Hard resetting via RTS pin...
Let’s look at our program running. Using our terminal program, connect to our USB device (using the baud rate that we defined in the build, the default rate is 115200). You should output similar to the listing below:
rst:0xc (SW_CPU_RESET),boot:0x13 (SPI_FAST_FLASH_BOOT)
configsip: 0, SPIWP:0xee
clk_drv:0x00,q_drv:0x00,d_drv:0x00,cs0_drv:0x00,hd_drv:0x00,wp_drv:0x00
mode:DIO, clock div:2
load:0x3fff0018,len:4
load:0x3fff001c,len:6364
load:0x40078000,len:11152
load:0x40080400,len:6692
entry 0x40080764
I (31) boot: ESP-IDF v3.3-beta1-223-ga62cbfec9-dirty 2nd stage bootloader
I (31) boot: compile time 23:19:50
I (43) boot: Enabling RNG early entropy source...
I (43) boot: SPI Speed      : 40MHz
I (43) boot: SPI Mode       : DIO
I (46) boot: SPI Flash Size : 4MB
I (50) boot: Partition Table:
I (54) boot: ## Label            Usage          Type ST Offset   Length
I (61) boot:  0 nvs              WiFi data        01 02 00009000 00006000
I (68) boot:  1 phy_init         RF data          01 01 0000f000 00001000
I (76) boot:  2 factory          factory app      00 00 00010000 00100000
I (83) boot: End of partition table
I (88) esp_image: segment 0: paddr=0x00010020 vaddr=0x3f400020 size=0x075d4 ( 30164) map
I (102) esp_image: segment 1: paddr=0x000175fc vaddr=0x3ff80000 size=0x00000 (     0) load
I (105) esp_image: segment 2: paddr=0x00017604 vaddr=0x3ff80000 size=0x00000 (     0) load
I (114) esp_image: segment 3: paddr=0x0001760c vaddr=0x3ffb0000 size=0x01e94 (  7828) load
I (125) esp_image: segment 4: paddr=0x000194a8 vaddr=0x3ffb1e94 size=0x00000 (     0) load
I (132) esp_image: segment 5: paddr=0x000194b0 vaddr=0x40080000 size=0x00400 (  1024) load
I (141) esp_image: segment 6: paddr=0x000198b8 vaddr=0x40080400 size=0x06758 ( 26456) load
I (156) esp_image: segment 7: paddr=0x00020018 vaddr=0x400d0018 size=0x1258c ( 75148) map
I (174) esp_image: segment 8: paddr=0x000325ac vaddr=0x40086b58 size=0x01400 (  5120) load
I (175) esp_image: segment 9: paddr=0x000339b4 vaddr=0x400c0000 size=0x00000 (     0) load
I (180) esp_image: segment 10: paddr=0x000339bc vaddr=0x50000000 size=0x00000 (     0) load
I (189) esp_image: segment 11: paddr=0x000339c4 vaddr=0x50000000 size=0x00000 (     0) load
I (200) boot: Loaded app from partition at offset 0x10000
I (204) boot: Disabling RNG early entropy source...
I (210) cpu_start: Pro cpu up.
I (214) cpu_start: Application information:
I (219) cpu_start: Project name:     hello-world
I (224) cpu_start: App version:      v3.3-beta1-223-ga62cbfec9-dirty
I (231) cpu_start: Compile time:     23:19:53
I (236) cpu_start: Compile date:     Jan 23 2019
I (241) cpu_start: ESP-IDF:          v3.3-beta1-223-ga62cbfec9-dirty
I (248) cpu_start: Starting app cpu, entry point is 0x40080e00
I (227) cpu_start: App cpu up.
I (259) heap_init: Initializing. RAM available for dynamic allocation:
I (266) heap_init: At 3FFAE6E0 len 00001920 (6 KiB): DRAM
I (272) heap_init: At 3FFB2EE0 len 0002D120 (180 KiB): DRAM
I (278) heap_init: At 3FFE0440 len 00003AE0 (14 KiB): D/IRAM
I (284) heap_init: At 3FFE4350 len 0001BCB0 (111 KiB): D/IRAM
I (291) heap_init: At 40087F58 len 000180A8 (96 KiB): IRAM
I (297) cpu_start: Pro cpu start user code
I (17) cpu_start: Starting scheduler on PRO CPU.
I (0) cpu_start: Starting scheduler on APP CPU.
Hello world!
This is ESP32 chip with 2 CPU cores, WiFi/BT/BLE, silicon revision 0, 4MB external flash
Restarting in 10 seconds...
That’s it! You’ve successfully installed, built, and flashed your C-program to your ESP32 device! One last tip. Be sure to disconnect your serial terminal program from the device when you want to reflash. Failing to do so will cause your flashing to fail as the device will be busy.
Next Steps
Now that you know how to build projects, go take a look at a more advanced project found in the ESP-IDF examples directory. Be sure to follow the three steps above. In more complicated examples, you may need to configure project-specific items (such as SSID and passwords for wifi). Read the README.md file for project-specific details.
Finally, all that you want to know about the API can be found here.
Go have fun!!