
Pothos - A New Take on Data-Flow Frameworks
Data-Flows… like a river
In today’s post, I thought I’d take a look at and discuss the Pothos toolkit, a work-flow tool that improves upon the design principles of gnuradio and enables real-time data-flow processes for real-time applications.
Using a MacBook Pro, an ettus N210 SDR, and an FM-antenna, I’ll show how easy it is to build an FM Receiver to listen to your favorite radio stations on your laptop. While it’s an expensive way to tune in to your local DJ, it’s a great demonstration of how to use this great kit (written by Josh Blum).
So what’s in the box?
Pothos project is a complete data-flow framework for creating topologies of interconnected processing blocks. Topologies can be designed and tested graphically, and deployed over a network. The Pothos framework API is sleek and smart, enabling users to quickly create custom processing blocks with minimal boiler-plate. Processing blocks can support computational offload and integration with DMA devices. The project also has a diverse set of processing and hardware support toolkits.
Installation
While there is a homebrew recipe, the dependencies are not up-to-date and thus installation (at the time of writing this post) is problematic. So instead, I strongly suggest building and installing from source.
Josh has written extensive documentation on installing the Pothos dependencies and core software for multiple Operating Systems.
Keep in mind Pothos is built on top of SoapySDR - an abstraction of the SDR hardware. In our case, we need to also install the UHD Soapy Driver to access the N210 SDR, SoapyUHD. Just a reminder, that before you can install SoapyUHD, you’ll need to install the base UHD software from Ettus.
Now that you have all of the dependencies installed, and assuming you already have cmake installed on your computer, go ahead and build the source. After the code is built, install it.
If everything built and installed correctly, you should be able to verify your build using the PothosUtil command:
PothosUtil  --system-info
Lib Version: 0.6.0-gee71cd90
API Version: 0.6.0
ABI Version: 0.6
Root Path: /usr/local
Data Path: /usr/local/share/Pothos
User Data: /Users/robert/.local/share/Pothos
User Config: /Users/robert/.config/Pothos
Runtime Library: /usr/local/lib/libPothos.0.6.0.dylib
Util Executable: /usr/local/bin/PothosUtil
Dev Include Path: /usr/local/include
Dev Library Path: /usr/local/lib
Next, let’s verify that we can access our SDR:
$ PothosUtil --device-info

>>> Specify --device-info=deviceType for more information...
>>> Available device types in the plugin tree are:
  * audio
  * soapy
Here, we see that we have the default OSX audio device and the soapy driver installed an available to Pothos. Specifying soapy for our device-info type shows us our SDR info.
PothosUtil --device-info=soapy
>>> Querying device info: /devices/soapy/info
Mac OS; Clang version 9.0.0 (clang-900.0.39.2); Boost_106600; UHD_003.010.002.000-0-unknown

{
    "SoapySDR info": {
        "ABI Version": "0.6",
        "API Version": "0.7.0",
        "Factories": "null, uhd",
        "Install Root": "/usr/local"
    }
}
FM - demystified
Now that we have an installed and working Pothos environment, let’s start up the Gui and take a look around before we Build an FM radio.
Start the gui using the PothosFlow command. You’ll notice right away the similarities to gnuradio companion (grc). There are blocks available on the right-side panel, a canvas that contains the blocks on the left, and a Message window on the botton.
Simple Flow
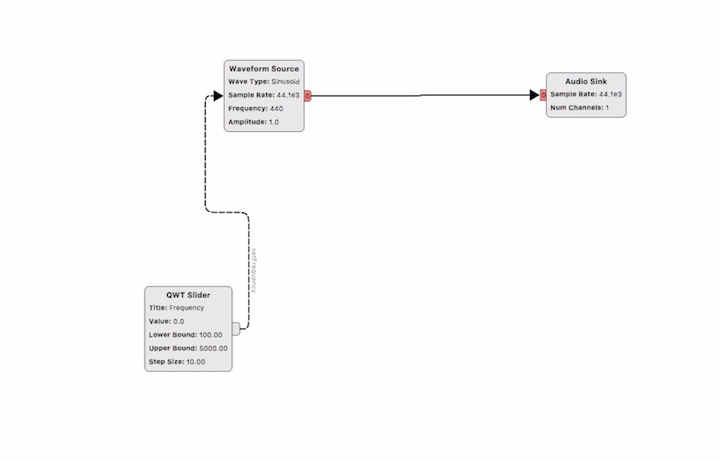
In general you can think of flows as sources and sinks with directed arrows connecting them indicating a directed flow. Let’s imagine a very simple flow of a tone at 440Hz going to the audio sink.
Drag an Waveform source onto the canvas from the Block Tree panel. Next, drag an audio sink component onto the canvas just to the right of the source.
Great, we now have a source and a sink, but we need to configure each of them, and connect the source to the sink to make a flow.
Double-click on the Waveform source. Make sure that the following parameters are set in the block:
- Data Type: Float32
- Wave Type: Sinusoid
- Sample Rate: 44.1e3 (44,100 Khz)
- Frequency: 440
That’s it - we’ve just configured a Waveform that generates a 440Hz (also known as A on the musical scale).
Next, let’s look at the sink. Double-click on the sink, and inspect the Data Type, and Sample Rate and you’ll notice that they correspond to the values we’ve configured in our Waveform block.
Now we complete the flow by dragging a line from the Waveform to the Sink. That’s it! So what next? You need to execute the flow by Activating the topology. You can do this via the gear button in the gui, or via the Execute menu option (F6). If you configured and connected your flow properly, you should hear a tone. The tone will sound until you terminate the flow topology by clicking the gear button (or toggling the Execute menu item). Furthermore, you may want to save your cool tone generator! Using the File menu Save-As selection, you can save your flow for future use.
What other tones can we generate?
Let’s dive in deeper and see how we can create a UX component to modulate the tone. Instead of just hard-coding a value of 440Hz into our Waveform widget, let’s add a user-controlled widget. Notices the Widgets category in the blocks panel. Let’s select a QWT Slider and drag it onto the canvas. Next, double-click on the widget to configure its properties. Specifically, let’s set the Lower and Upper Bounds to 100 and 5,000, respectively, as well as the Step-Size to 10.0. We will use these values for the Frequency setting in the Waveform widget. To do that, we drag a line from the QWT Slider widget to the Waveform widget. When we do so, we see a Connection dialog in the Properties Panel. Select the valueChanged property on the left (representing the QWT Slider value change) and the setFrequency property of our Waveform widget on the right, and press commit to make the connection. After you’ve made the connection, it will appear in the dialog box below, indicated by a text-entry valueChanged -> setFrequency. Lastly, we need to place the actual widget on the Canvas. To do that, right-click on the QWT Slider widget and select Insert Graph Widget… and to the right of the menu option, select the Slider widget in the menu. A UX component will be placed on the canvas.
Don’t mix your Peas and Carrots!!
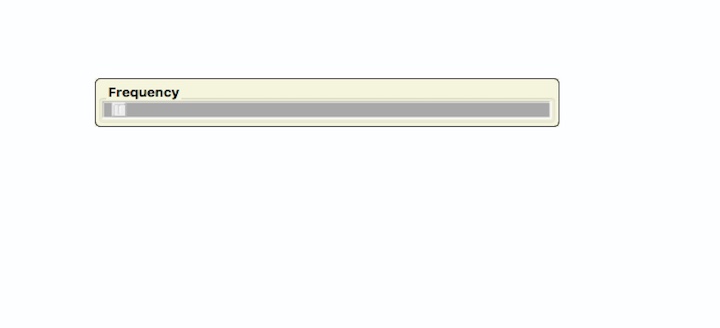
At this point, our canvas is a mix between logical blocks that represent our configured data-flow and user-interface elements that actually control elements of our flow. It’s a good idea to separate the two. Right-click in the canvas and select the Graph Page Options… menu and select Create new graph page. We can name it whatever we want - UX. Now we can go back to the GUI UX component and double-click on it to modify it’s properties - let’s set the Title to Frequency. Right-clicking on the UX compoment lets us move it to our UX canvas page.
Now when we activate the topology and slide the slider, we can modulate the frequency by sliding the slider up and down. Actually sounds kind of cool! I imagine one could actually use Pothos to create a cool digital audio Synthesizer!
Although our flow-diagram is very basic, we’ve demonstrated some concepts that are critical to effectively using Pothos in a real-world use-case.
- Dragging Widgets onto the Canvas
- Configuring Properties
- Connecting data-flows
- Creating UX Widgets
- Connecting value-changes to Widget Properties
Calling Radio Moscow, Radio Moscow. Come in Moscow!!
Okay, let’s get real now and take a look at an SDR example that generates a topology which implements an FM tuner. Grab this file and open it with PothosFlow. Notice that there are three panel panes on the Canvas.
- ControlPanel - containing the UX components.
- Demod Chain - data-flow components which implement the FM demodulation.
- RF Frontend - data-flow components that setup the RF front-end.
FM Demod:
RF Frontend
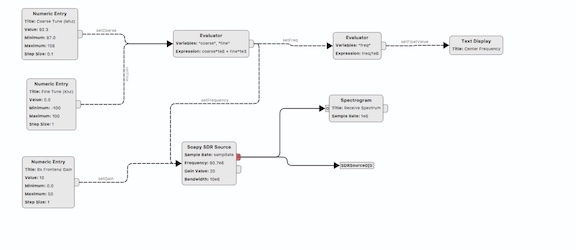
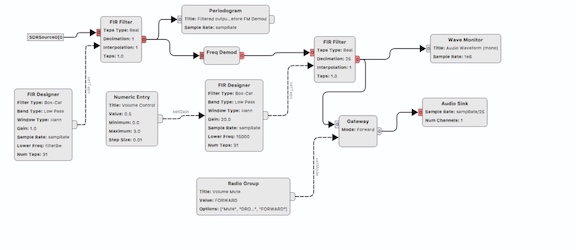
Let’s start from the bottom and work our way towards the UX component panel. Looking at the RF Frontend panel, we see that we set both Frequency (course and fine grain inputs) as well as gain and feed them into the SoapySDR widget. Out of the SoapySDR widget, we feed the output to a Spectogram widget and an Input Breaker. A Breaker lets us span panels on the canvas. In this case, we connect the output of the SDR on the RF Frontend to the Demod Panel Output Breaker. Switch panels and let’s look at the Demod Chain.
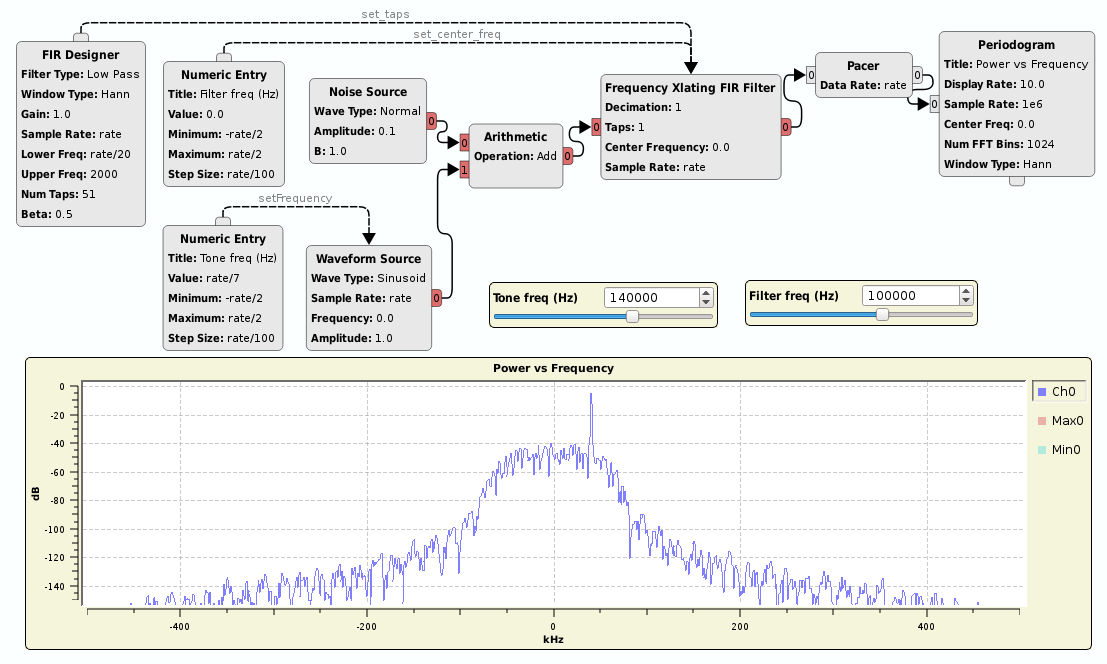
Here we see that we flow our SDR into an FIR Filter. Flowing out of the FIR Filter is a Periodogram widget that plots the 2D Power vs. Frequency as well as flowing into a Freq Demod widget. This widget extracts the Real signal from the Complex signal coming out of the FIR Filter. Out of this widget we flow to two widgets: a gateway widget which acts as a switch to turn on and off our flow signal to the follow-on widget - in this case the Audio Sink widget, and the Wave Monitor widget which plots a 2D waveform with respect to time.
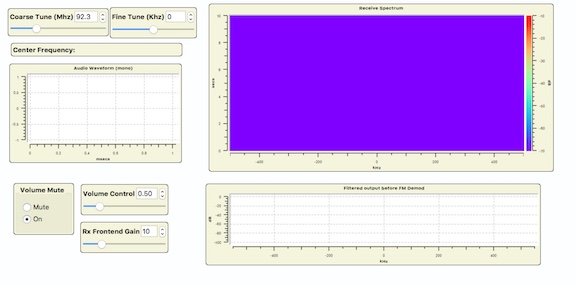
Lastly, let’s look at the Control Panel page containing the UX widget components. Here we see the gui-elements that represent the controls for our FM radio. Specifically:
- Course Tune (Mhz) Slider
- Fine Tune (khz) Slider
- Volume mute button
- Volume control
- Rx Frontend Gain Slider
- Spectrum and FM Demod plotters
Crank it up!
So, fire it up by activating the topology. Tune it up to a local FM station that you know has clear reception and listen and look at your radio go!