
OCaml OpenGL - Get into Gear!
OCaml and OpenGL - Getting our Functional Programming into Gear!
In my blog post for this day, I thought I’d take a look at the OCaml OpenGL library, lablgl. If you’re not already familair with openGL, I strongly suggest that you take a look at one of the tutorials available online. One that I found to be very informative; although written in c++, is opengl-tutorial. Nonetheless, in this post, we’ll look at some simple, and not so simple examples written in OCaml. But before we can do that, we need to install the requisite opam dependencies. To install lablgl, simply:
opam install lablgl
Next, if we want to experiment with lablgl in utop, be sure to require both lablgl and lablgl.glut. Let’s take a look a an extremely simply example. For this post, I’m going to speak the the examples that were ported from the c/c++ examples to OCaml and can be found in this repo. I’ve taken these examples and added jbuilder build files to simplify building each example.
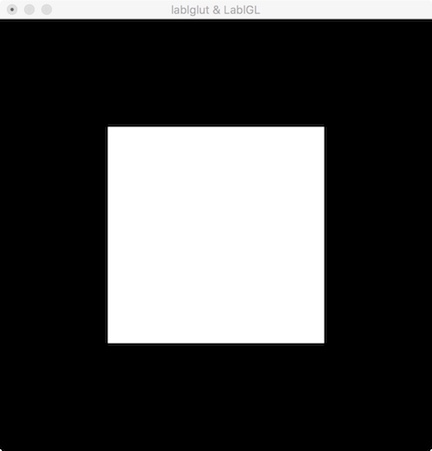
First, let’s take a look at simple.ml:
let main () =
  ignore(Glut.init Sys.argv);
  Glut.initDisplayMode ~alpha:true ~depth:true () ;
  Glut.initWindowSize ~w:500 ~h:500 ;
  ignore(Glut.createWindow ~title:"lablglut & LablGL");
  Glut.displayFunc ~cb:
    begin fun () -> (* display callback *)
      GlClear.color (0.0, 0.0, 0.0);
      GlClear.clear [`color];
      GlDraw.color (1.0, 1.0, 1.0);
      GlMat.mode `projection;
      GlMat.load_identity ();
      GlMat.ortho ~x:(-1.0,1.0) ~y:(-1.0,1.0) ~z:(-1.0,1.0);
      GlDraw.begins `polygoner;
      GlDraw.vertex ~x:(-0.5) ~y:(-0.5) ();
      GlDraw.vertex ~x:(-0.5) ~y:(0.5) ();
      GlDraw.vertex ~x:(0.5) ~y:(0.5) ();
      GlDraw.vertex ~x:(0.5) ~y:(-0.5) ();
      GlDraw.ends ();
      Gl.flush ()
    end;
  (* ignore (Timer.add ~ms:10000 ~callback:(fun () -> exit 0));  *)
  Glut.mainLoop();
  ;;

let _ = main ()
Before we begin, you may notice the use of ignore. It’s a common use pattern to wrap a function that produces a side-effect with an ignore. We aren’t interested in the value of the expression; rather, its side-effect.
The first thing we do is initialize the OpenGL Utility Toolkit, Glut by calling ignore(Glut.init Sys.argv);. Also, notice the use of the semi-colon. Since most of our calls to the library are side-effect inducing calls, we must separate our expressions with semi-colons.
The next three calls set the display mode, the window size, set the title and create the actual window.
    Glut.initDisplayMode ~alpha:true ~depth:true () ;
    Glut.initWindowSize ~w:500 ~h:500 ;
    ignore(Glut.createWindow ~title:"lablglut & LablGL");
As a reminder, all of the parameters to our functions are called out by named parameters. We access them using a tilde followed by the parameter name, a colon, and the value associated with the parameter. ~param1:val1.
Now that we’ve initialized and created our window, we create a callback function that we pass to Glut.displayFunc. Our callback function will be executed when we enter the Glut.mainLoop() function. Another note - OpenGL is event-based with callbacks. We establish callbacks for the events that we want to respond to, and then fire off the mainloop. When an event occurs that we established a callback for, our code is executed. This paradigm can be confusing if you’re inexperienced at event-based callback programming. Don’t get wrapped around the axils - keep in mind what you’re trying to accomplish when an event occurs and think of your program as a state-machine.
So, our displayFunc callback will do the following when we get notified to write to the display:
begin fun () -> (* display callback *)
      GlClear.color (0.0, 0.0, 0.0);
      GlClear.clear [`color];
      GlDraw.color (1.0, 1.0, 1.0);
      GlMat.mode `projection;
      GlMat.load_identity ();
      GlMat.ortho ~x:(-1.0,1.0) ~y:(-1.0,1.0) ~z:(-1.0,1.0);
      GlDraw.begins `polygon;
      GlDraw.vertex ~x:(-0.5) ~y:(-0.5) ();
      GlDraw.vertex ~x:(-0.5) ~y:(0.5) ();
      GlDraw.vertex ~x:(0.5) ~y:(0.5) ();
      GlDraw.vertex ~x:(0.5) ~y:(-0.5) ();
      GlDraw.ends ();
      Gl.flush ()
    end;
So what’s going on here?? We specify an RGB color (notice that RGB color values are floats between 0.0 and 1.0) of black (all zeros for red, green, and blue values, respectively). Next we clear the screen to black. Then we specify the color white to draw with (all rgb values of 1.0).
Next we need to pause and talk about coordinates, matrices and transformations. In GL, we use separate matrices to represent different transformations element in our GL world - and when we separate these elements into individual matrices, we can easily transform coordinates among these representations. I STRONGLY ENCOURAGE YOU TO READ THE MATRICES TUTORIAL!!!
Coordinates
So when dealing with any graphing we need to understand how we represent our coordinate system - both for 2D and 3D coordinate systems. In GL, we use the right-hand rule to represent coordinates in 3D space. The rationalization for doing so isn’t arbitrary; rather, a large body of math exists from years of using this coordinate system in the physical world. Given that, we represent points in 3D-space (X,Y,Z) as:
- X in on your right
- Y is up
- Z is towards your back - behind, not in front of you.
So, using your right hand and making your thumb, index, and middle fingers all mutually at right angles to one another (orthogonal unit vectors in the x, y, and z planes), and pointing your index finger up and your thumb to the right gives us a right-hand-rule coordinate system frame of reference. In GL, the center of the frame of reference is at the middle of the screen with coordinates of $0, 0, 0$. Without transforming our coordinates, the other points of reference to the origin may be helpful to keep in mind when defining points on the screen:
- -1, -1, 0 -> Bottom left of the screen
- 1, -1, 0 -> Bottom right of the screen
- 0, 0, 0 -> Center
- -1, 1, 0 -> Top left of the screen
- 1, 1, 0 -> Top right of the screen
Note, we said that these coordinates are where we say they should be above so long as we don’t transform them. By transform them, we mean we can scale, rotate, and transform coordinates using matrix transformations. Additionally, we can transform models, views, and cameras, and compose these transformations creating our display.
Matrix Transforms
So what does it mean to transform a matrix? Well, in simple terms, we create a function, $T(M)=M^*$. Applying the transform function on our input matrix, $M$, yields a new matrix, $M^*$, that is changed in some way. We can:
- Scale - change the size of our coordinates making them closer or farther apart from one another
- Rotate - spin our model some number of degrees about an axis.
- translate - move our coordinates from one location in our coordinate space to another location.
Putting this all together, using matrices, we can build a model in one coordinate system and transform this model by scaling, rotating, and translating it in our coordinate space for projection and display.
Back to our example
Given our understanding of coordinates, matrices, and transforms, we’ll look at the rest of the display callback.
The next call, GlMat.mode 'projection; establishes that we want to manipulate the projection transform (as opposed to the modelview transform). And we next load the identity matrix, which is the matrix equivalent of resetting to zero. Next, we modify our projection to use an orthogonal projection transformation. And finally, we draw a polygon, specifying the four vertices, and all the flush command requiring GL to force execute of our commands in finite time.
All that work to draw a simple white square!
Building our OCaml OpenGL Example
The easiest way to build the example above (assuming that you have installed the lablgl and jbuilder dependencies) is to use jbuilder. Convention dictates creating a new directory, simple for example, and then placing the source and jbuild file into that directory.
Here’s what our build file looks like:
(jbuild_version 1)

;; comments
(executable
 ((name simple)
 (libraries  (compiler-libs.toplevel utop core lablgl.glut ))
 (link_flags (-linkall))
 (modes      (byte))))
We can easily build the program by:
$ jbuilder build simple.exe
And the built executable is located in _build/default/simple.exe
Give it a try! Kinda boring!! Let’s move past the simple basics and look at something a little more complicated.
Going Beyond Simple
Next, let’s introduce a few more ideas to go beyond our simple square. Let’s modify what we are drawing over time, and let’s also look at how we an incorporate events like keyboard input into our example.
This is still a simple example, but it will begin to give insight into how you would make something that was responsive and transformative to user input. In this example, we’ll draw a triangle, and we’ll rotate and color it randomly each time we draw it. We’ll terminate once the user hits the Escape key.
Take a look:
let () =
  ignore (Glut.init Sys.argv);
  Glut.initDisplayMode ~double_buffer:true ();
  Glut.initWindowSize ~w:512 ~h:512;
  ignore (Glut.createWindow ~title:"Flipper Demo");
  GlClear.color (0.1, 0.2, 0.1);
  GlDraw.shade_model `smooth;
  let draw () =
    GlMat.mode `projection;
    GlMat.load_identity ();
    GluMat.ortho2d ~x:(-1.5, 1.5) ~y:(-1.5, 1.5);
    GlMat.mode `modelview;
    GlMat.load_identity ();
    GlClear.clear [ `color ];
    GlDraw.color (Random.float 1., Random.float 1., Random.float 1.);
    GlMat.rotate ~angle:((Random.float 1.) *. 10.) ~x:1. ();
    (* GlDraw.color (0.1, 0.3, 0.1); *)
    GlDraw.begins `triangles;
    List.iter GlDraw.vertex2 [-1., -1.; 0., 1.; 1., -1.];
    GlDraw.ends ();
    Gl.flush ();
    Glut.swapBuffers () in Glut.displayFunc ~cb:draw;

    Glut.idleFunc ~cb:(Some Glut.postRedisplay);
    Glut.keyboardFunc ~cb:(fun ~key ~x ~y -> if key=27 then exit 0);

    Glut.mainLoop ()
Pretty much looks similar to our first example, except for the Glut.keyboardFunc ~cb:(...). Here we are setting a callback function that check to see if we hit the Escape Key, ASCII 27, and if so, exit our program.
Check out the GlMat.rotate call inside the draw callback. We specify that we want to rotate around the $x$ axis. We could have also specified to rotate around the $y$ and or $z$ axis too!
Also in our draw callback, we change the color each time randomly so the face of our triangle is going to flash each time we draw it as the colors are all over the place.
Still a pretty simple example. Let’s look at an example that takes keyboard input to modify our projection and or model.
Not So Simple!
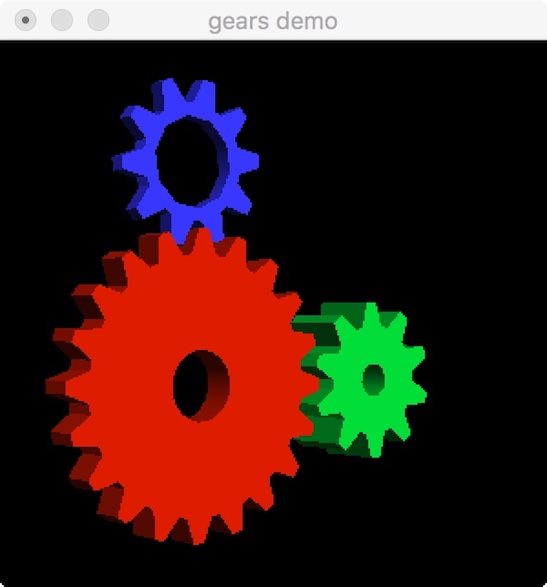
Here’s the classical OpenGL gears demo written by Brian Paul (and reconstructed in OCaml by raffalli in 2003). I won’t display all of the code here in this post (open it in a new tab if you want to see all of it). Rather, I’ll highlight the callbacks that modify the display:
let _special_key_callback ~key ~x ~y =
        let delta = 5.0 in
        let redisp = ref true in
        match key with
            | Glut.KEY_LEFT  -> view#roty (-. delta) ;
            | Glut.KEY_RIGHT -> view#roty delta ;
            | Glut.KEY_DOWN  -> view#rotx (-. delta) ;
            | Glut.KEY_UP    -> view#rotx delta ;
            | _ -> begin
                redisp := false;
                ();
            end;
        if !redisp then Glut.postRedisplay ();
    in

    Glut.keyboardFunc ~cb:_keyboard_callback ;
And let’s take a look at one of the transforms. Say for example, we press the left arrow key, we’ll call the view#roty with a negative delta. Remember, moving left is rotating around the $y$ axis in the negative direction (use your right-hand rule if you need to!).
class view ~gear1 ~gear2 ~gear3 ~limit = object (self)
    val mutable view_rotx = 0.0
    val mutable view_roty = 0.0
    val mutable view_rotz = 0.0
    val mutable angle = 0.0
    val mutable count = 1

    method rotx a = view_rotx <- view_rotx +. a
    method roty a = view_roty <- view_roty +. a

    method draw =
        GlClear.clear [`color;`depth];

        GlMat.push ();
        GlMat.rotate ~angle:view_rotx ~x:1.0 ();
        GlMat.rotate ~angle:view_roty ~y:1.0 ();
        GlMat.rotate ~angle:view_rotz ~z:1.0 ();

        ...
So when we call the roty method, we modify the mutable float for that value. When we call our draw method for the view class (which is our callback - Glut.displayFunc ~cb:(fun () -> view#draw) ;), we will reflect the changed values for our gears.
The code is a little complicated, but try walking through it and see if you can follow it. There are some new GL elements that we’ve not seen before - Gl.enable, Gl.push, Gl.pop, and a new callback - Glut.reshapeFunc ~cb:_reshape .
Also notice how the code is written to use OCaml classes. The view class has the following methods:
- rotx
- roty
- draw
- idle
- reshape
Encapsulating the view methods inside a class is a clean way to manage our representations of the three gears and their associated code to modify their behaviors.
Next Steps
There’s a lot going on in OpenGL programming - regardless of the language your choose to use. I think the next steps for anyone interested in playing around with OpenGL is to experiment. Grab a chuck of code, and play with the Module. Experiment with each of the calls and see how modifying values passed to each function changes your program. I’d start with a working example and play with changes for a particular function, moving on once you understand its behaviors.
– Have fun!